

If you’re a true coffee lover then you likely go through the motion of grinding your own beans at home. You’ve also no doubt invested in all sorts of coffee paraphernalia ranging from French presses to pour over coffee makers and everything in between. But to take it one step further and become a true coffee geek, you need to roast your own beans using a home coffee roaster.
But that begs the question, why? It’s already easy enough to buy a bag of quality roasted beans from a supermarket or cafe, so why do it at home?
Editor’s Pick: The Fresh Roast SR800 Home Coffee Roaster
Quality 4.5/5
Pricing 3.5/5
Features 5/5
Consistency 5/5
Intuitive, compact, easy to use, consistent and powerful enough for roasters of all levels, the Fresh Roast SR800 takes the crown as the best home roaster.
Why Roast Coffee Beans at Home?
It all comes down to freshness. One of the main perks of having your own home coffee roaster is being able to roast your green coffee beans only when you need them. This allows you to consume them the very second that they come out the roaster, offering unparalleled freshness when you make your own coffee. It also gives you full control of the roasting process, meaning you can precisely dial in exactly how you’d like your beans roasted and what type of coffee you want to consume.
On top of that, it’s also a great way of delving deeper into the roasting process and understanding exactly how coffee is made. It’s a learning exercise that allows you to take your coffee-related knowledge to the next level.
Of course there’s nothing wrong with buying whole roasted beans from the supermarket. But many coffee aficionados want to understand the coffee making process from bean to cup, and so learning how to roast is undoubtedly appealing.
And with that in mind, we’ve put together a list of some of the best home coffee roasters machines currently on the market. We want to equip you with the tools and knowledge to help you, no matter what stage of the roasting journey you’re currently on. Whether you’re an amateur, expert, or somewhere in the middle, want to make light roasts, dark roasts, or medium roasts, you’ll find a roaster for you on this list.
Rock and Roast: Our Ranking Factors for The Best Home Coffee Roaster
When compiling this list, we took into account a number of different determining factors which helped us narrow down the selection.
Roaster Type
Coffee roasters generally fall into two broad categories:
Air Roaster
An air roaster heats and roasts the beans using indirect heat. It’s very similar in design and functionality to a convection oven, which uses fans to move hot air around an enclosed space.
Drum Roaster
Drum roasters use direct heat in order to heat and roast the beans. A source of heat is applied to a single spot on a cylindrical drum, which then rotates in order to evenly roast the beans inside. T
Unlike an air roaster, it doesn’t rely on fans and air currents to distribute the heat. It’s also slower than an air roaster, taking between 14 and 20 minutes to complete a roast. That being said, its stately speed of operation produces a very even roast.
Top 7 Home Coffee Roasters at a Glance
Now that you’re aware of how we chose our home coffee roasters, let’s take a look at their specifications.
*Price at the time of writing this article
Roaster & Price |  Features |  CF Award |
|---|---|---|
 Fresh Roast SR540 Check Latest Price | + Affordable. + Easy to use. + Compact. |  Best Allrounder Roaster |
 Nuvo Eco Handy Ceramic Coffee Bean Roaster Check Latest Price | + Shape promotes even roasting. + Easy to use. + Functions on gas stoves and open firms. |  Most Eco-Friendly |
 Nesco CR 1010 Professional Check Latest Price | + Smoke suppressor keeps the machine quite smoke-free. + Features an automatic auger that constantly moves beans for uniform roast. | Best Smokeless Roaster |
 Kaldi Home Coffee Roaster Check Latest Price | + Offers control over all roasting variables. + Air roasting technology helps achieve even roasts. + Attractive design. | Best High-End Roaster |
 MIFXIN Coffee Roasting Machine Check Latest Price | + Non-stick chassis. + Easy to clean. | Best Countertop Roaster |
 CAFEMASY Stainless Steel Home Coffee Roaster Check Latest Price | + Simple design. + Extremely affordable. | Best Travelling Roaster |
 Fresh Roast SR800 Check Latest Price | + Features are easy to adjust with a single knob. + Easy-to-read LCD display. | Editor’s Pick, Most Consistent Roaster |
Our Favorite Home Coffee Roasters, Ranked and Reviewed.
Still hungry for more detail? Below we delve into the nitty-gritty of what makes each home coffee roaster special, as well as features you should be aware of.
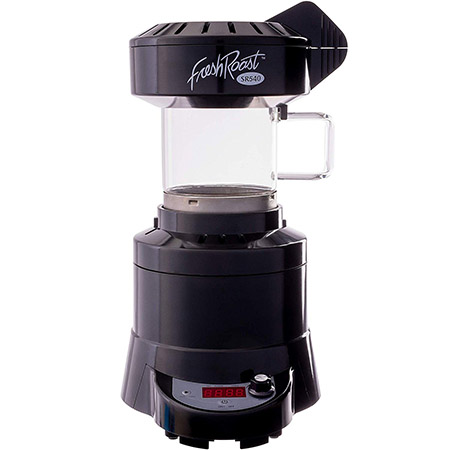
Fresh Roast SR540 – Best Allrounder Roaster
If you’re just starting out and not sure how far you want to take your roasting hobby, then the Fresh Roast SR540 is the perfect tool to dip your toes. It’s the perfect combination of functionality, controllability, and portability, and it won’t break the bank either.
The SR540 is also very simple to use. It comes with 9 different temperature settings, a dial for adjusting the fan as well as a customizable timer. This gives you some space to play around with different roast profiles without overwhelming you with limitless choice.
It also uses convection heat to get the job done. This isn’t a drawback per se, but it does mean that you won’t be able to roast quantities bigger than about 4 oz, or 120 grams. However, it will complete a roast in less than 9 minutes, so you can always roast multiple batches without too much trouble.
The SR540 is a pretty decent coffee roaster, especially for the price. The team really put a lot of thought into the design and improved on many things that the SR500 was lacking. For example, the heat settings on the SR500 were limited to low, medium, or high. The 0-9 heat settings on the SR540 give you much more control over the roasting process, allowing you to achieve much more nuanced flavor profiles. They also improved upon the roast chamber, equipping it with a wider diameter, more secure handle, and making it better able to circulate the beans for a more even roast.
Where the SR540 falters is with its chaff collector. Simply put – it’s not very good at collecting all of the chaff, so you might have to use a fan or hairdryer to manually remove all of the chaff after roasting. Leaving the chaff on the bean affects the taste quite a lot. If you’re someone who doesn’t mind that, then this probably won’t bother you too much.
After much use, we found that any fan setting less than 6 is not strong enough to move the beans sufficiently to achieve an even roast. If you use a heat setting of less than 8 you won’t get a decent roast. Ideally, you should use a time setting of 9, a heat setting of 9, and a fan setting of between 8 and 9, adjusting the speed periodically as the roasting process goes on. This will give you a delicious medium-dark roast.
At the end of the day, the SR540 is a great roaster for the price, especially if you’re just starting out or are a casual roaster. If you’re someone who wants a more professional setup, then we can recommend something like the Kaldi, but it will set you back way more than the SR540.
Here’s a video of how the Fresh Roast SR540 works, put together by Sweet Maria’s Coffee on YouTube:
Pros and Cons
Pros
- Affordable
- Easy to use
- Compact
How to use the Fresh Roast SR540:
- Measure out your beans. The SR540 can roast about 5 ounces or 140 grams at a time, but we found that for the best results with the most even roast, adding about 4 ounces or 130 grams is the sweet spot.
- Pour the beans into the roasting chamber then secure it by locking the lid into place.
- Set the temperature, fan speed, and time settings. They’re all controlled by a single knob – just push the knob to toggle between the different parameters. While the SR540 is set to factory settings with the fan at 5, the heat at 9, and the time at 6, we found that the best roasts occurred when the temperature and fan speed were set on much higher temperatures. You’ll have to experiment to get the precise roast you want.
- While the S540 does come with a timer, it’s a little confusing to use so we recommend using a separate timer. For a medium to dark roast with the settings on high, roast the beans for around 10 to 11 minutes. You should begin to hear the first crack around four minutes into the roast.
- For greater control of the roasting process, you can turn the knob by about 90 degrees to the right in order to see the real-time internal temperature of the chamber.
- At around eight minutes, turn the temperature setting down to 6 or 7, but keep the fan setting high to cool to beans slightly.
- At around 11 minutes, the process should be finished and your beans ready to be ground.
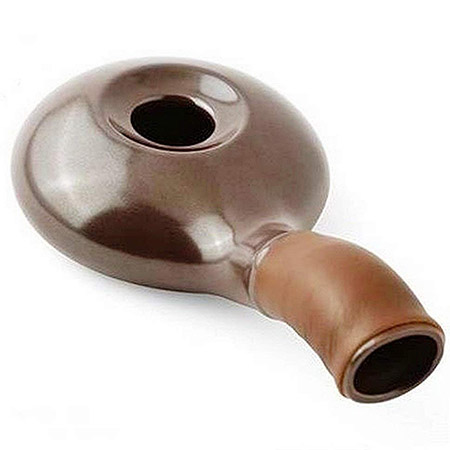
Nuvo Eco Handy Ceramic Coffee Bean Roaster – Most Eco-Friendly Roaster
If you want a simple roaster that you can take with you on a camping trip, then consider the Nuvo Eco Handy Ceramic Coffee Bean Roaster. Constructed of ceramic, this roaster is no-frills and minimalist, and needs nothing but a stovetop or open fire to roast your beans to the desired level.
The operation couldn’t be easier. Simply fill the chamber with raw coffee beans – you’ll be able to fit around 70g (3oz) or so – then place it over your heat source. Since there are no sensors to measure the progress of your roast you’ll have to keep an ear out for the first and second cracks.
This is definitely one of the cheaper roasters on the list, but it’s also very hands-on. Roasts should take up to 10 minutes but don’t offer any control over the roast level, so keep a keen eye (and ear) on them the entire time to ensure your beans don’t burn. Oh, and please use gloves or oven mitts when transferring it to and from the heat source; this roaster gets hot.
Because the Nuvo is quite an analog piece of equipment, we found that it’s helpful to jot down the temperature every minute for the first couple of roasts that you do, until you find a roast that you like. This way, you can have the timing and temperature on hand for subsequent roasts, and take the guesswork out of achieving the same roast again. Also, the handle of the Nuvo is quite short, meaning you should wear some sort of heat protective glove or oven mitt to ensure that you don’t burn your hands during use.
Making coffee using the Nuvo is quite a fun and hands-on process, but we should caution you that this isn’t a solution for everyday coffee-roasting. While it takes about as long as electric roasters, it lacks sufficient volume to roast large quantities of beans. The manufacturers claim it can take upwards of 70 grams, but we found that the goldilocks zone was 30 grams; any more and the beans don’t roast evenly. Because of this, we recommend a home coffee roaster with a larger drum such as the DYVEE Gas Burner Coffee Roaster, which can handle 400 grams of beans at its full capacity.
Here’s a video of how to roast coffee with the Nuvo Eco Handy Ceramic Coffee Bean Roaster by Sylvain Poirier:
Pros and Cons
Pros
- Shape promotes even roasting.
- Easy to use.
- Functions on gas stoves and open firms.
How to use the Nuvo Eco Handy Ceramic Coffee Bean Roaster:
- Place the Nuvo on a stove and turn the temperature to high.
- Preheat the Nuvo to around 480F or 250C, using an external thermometer to check the temperature (we recommend an infrared thermometer like the Fluke 62 Max).
- Add your beans to the Nuvo and then give it a vigorous shake for about a minute while keeping it off the heat.
- For the next few minutes, periodically add the Nuvo to the heat and then remove it from the heat and give it a shake in order to ensure an even roast and to prevent the beans from burning.
- After about five minutes, when the internal temperature of the bean reaches 350 – 380F or 175 – 190C, you should hear the first crack.
- Continue to heat and shake the beans.
- Once the temperature of the beans reaches about 400F or 205C, you can turn down the temperature of your stove. At this point, the beans will begin to maintain their own temperature and won’t need such a strong heat source.
- Once you hear a rapid popping sound – the second crack – it’s time to take the Nuvo off the heat completely. This should result in a medium roast at around 10 minutes. If you want it dark, roast the beans for another two minutes or so.
- Transfer the beans to a bowl or colander. Take them outside or place them under a fan and agitate them a bit. This should remove some of the chaff and start the cooling process so that the beans don’t roast further.
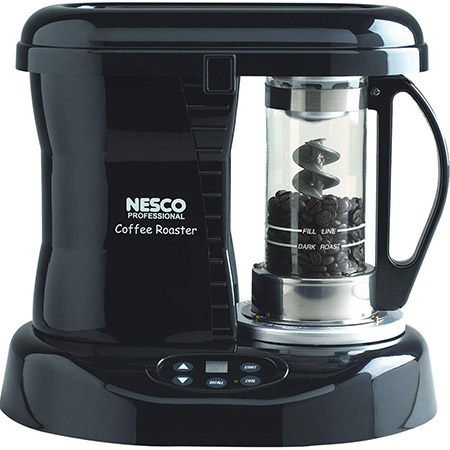
Nesco CR 1010 Professional – Best Smokeless Roaster
The Nesco CR1010 Professional is a beautifully-equipped allrounder that is ideal for someone who is already dedicated to home roasting. It utilizes convection heating in order to achieve an even roast with the help of an auger screw system to evenly distribute beans.
What’s great about the Nesco is that it comes with a built-in catalytic converter to help reduce the amount of smoke produced during roasting. An entire roast will take about 25 minutes, including a cooling down cycle of around 5 minutes. This little machine is great for light and medium roasts but suffers when producing dark roasts as it can’t cool the beans quickly enough.
That being said, it’s still very effective. The hopper holds up to 5oz or 150g of beans, which means you’re not exactly going to be mass-producing coffee. But if you’re a casual roaster who uses their home coffee roaster several times a week, it works just fine.
The 1010 is Nesco’s only coffee maker either. In fact, it’s their premium model. The auger helps ensure an even, consistent roast, and this is something that Nesco’s other coffee roaster doesn’t offer. However, the auger generates quite a bit of noise. This isn’t the type of roaster that you can simply turn on and leave while you have guests around. That being said, it is very simple and intuitive to use.
After using the 1010 for some time, we discovered that it’s really important to clean the chaff screen after use. If you don’t, it’ll become clogged and reduce the longevity of the machine. Another good tip is to let the machine cool down in between batches. We found that half an hour is more than enough. If you don’t, you risk overcooking the beans with the residue heat from the previous roast.
Burman Coffee has shared an insightful video about the Nesco Professional 1010:
Pros and Cons
Pros
- Smoke suppressor keeps the machine quite smoke-free.
- Features an automatic auger that constantly moves beans for a uniform roast.
How to use the Nesco CR1010:
- Weigh your coffee – between 4 and 5 ounces and add it into the roast chamber.
- Lock the chamber into place, making sure that it sits flush against the base of the roaster to prevent any smoke from escaping.
- Place the chaff collector on top of the roaster, then place the chaff screen on top of that before closing the lid.
- Unlike other roasters, the Nesco CR doesn’t have temperature settings. The only adjustable metric is the time that the beans are roasted. The factory settings are set to 20 minutes – 15 minutes of roasting and a 5-minute cool cycle – but if you want a darker roast, add between 3 and 4 minutes. You can adjust the time of the roast by using the arrow buttons at the base of the roaster.
- When you’re happy with your time, just press the start button.
- After about 8 or 9 minutes you should hear the first crack. This indicates that the beans have achieved a medium roast profile. You can confirm this visually by checking to see if the beans are an even gold color. If you want a dark roast, let the beans roast further until you hear the second crack.
- You can terminate the roast early by pressing the stop button, otherwise, just let the timer run out.
- Once you’ve stopped the roast, the cooling process will begin. Leave the beans in the chamber to cool the beans and collect the chaff. Once the cooling process is over, the roaster will shut off and your beans are ready to use.
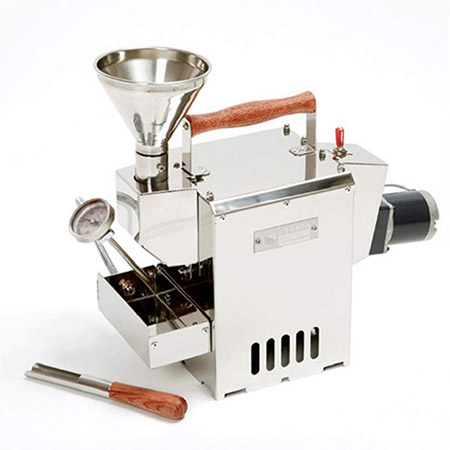
Kaldi Home Coffee Roaster – Best High-End Roaster
If money is no option and you’re serious about perfecting your roasting game and making some of the best coffee possible, then the Kaldi Home Coffee Roaster is the home roaster for you. This is a veritable roasting powerhouse revered by amateur roasters and baristas alike. It affords you great control of the roasting process without being needlessly complicated.
This roaster, while powerful and functional, lacks superfluous features such as timers and buttons. It does, however, offer you full control over roasting variables such as drum rotation speed, temperature, and roasting time. For the experienced roaster, this is more than enough to produce excellent roasts every time, but it’s not recommended for first-timers.
Functionality aside, the Kaldi Home Coffee Roaster is absolutely beautiful to look at. What it lacks, however, is a smoke suppressor. It’s therefore recommended that you keep this machine outside or in a well-ventilated area during use.
The Kaldi is an ideal roaster if you want to have a lot of control over all the roasting variables. It’s simple to operate, extremely robust, but does require a bit of knowledge and control to get optimal results. We recommend using gloves or oven mitts when tipping out the beans, as the steel exterior of the roaster can get extremely hot. We also found that the chaff holder can spill some of the captured chaff sometimes when removing the beans, so this is something that you should be aware of during the final stages of roasting.
At the end of the day, however, the Kaldi is a fantastic roaster that is definitely more serious for coffee fans who are willing to invest in high-end pieces of equipment. It’s in a league of its own when it comes to home roasters and ultimately results in perfectly roasted beans for an incredible cup of coffee.
A YouTube channel called ‘Learn To Roast’ uploaded a tutorial video for the Kaldi Basic roaster:
Pros and Cons
Pros
- Offers control over all roasting variables.
- Air rosting technology helps achieve even roasts.
- Attractive design.
How to use the Kaldi Home Coffee Roaster:
- Unlike other roasters on this list, the Kaldi Home Coffee Roaster requires an external heat source, so the first step in the roasting process is to fire up the stove, burner, or another heat source that you will be using and place the roaster on top of it.
- Next, turn on the rotating drum.
- Allow the drum to heat up to around 400F or around 205C, using the attached thermometer to keep track of the temperature. Depending on your heat source it should take around five minutes to reach the desired temperature.
- Once the drum is preheated, remove the stopper from the hopper and add your beans. The Kaldi Home Coffee Roaster has a large capacity at around 300g, but we found that 250g was the sweet spot for optimal, even roasting. Note that the beans might get backed up in the hopper, so it helps to agitate them slightly using the probe rod to help them go down smoothly.
- Next, start a timer so that you’re aware of exactly how long your beans will be in the chamber. At this point you can also reduce the heat slightly (although adding the room-temperature beans will already have a net cooling effect), to prevent any burning.
- Place the stopper back into the hopper to prevent any heat from escaping.
- Allow the temperature to climb up to 420F. At this point, there should be a fair amount of smoke emanating from the roaster and you should start to hear the first crack. Use the probe road to collect a sample of the beans and check their color.
- At this point, you can turn the heat off completely. Because the drum is made from 2mm thick stainless steel with 3mm punching, it’s extremely well insulated and the heat will continue to rise even without a continuous heat source.
- Depending on how you like your coffee, you can terminate the process here. If you like a darker roast, allow the beans to continue circulating in the drum until the second crack. If you’re unsure if they’re cooked or not, simply use the probe rod to double-check.Depending on how you like your coffee, you can terminate the process here. If you like a darker roast, allow the beans to continue circulating in the drum until the second crack. If you’re unsure if they’re cooked or not, simply use the probe rod to double-check.
- To free the beans, remove the hopper and set it to one side, remove the thermometer and chaff holder, turn off the drum, then, using the wooden handle of the top of the roaster, tip the entire device forward over a pan or bowl to catch the roasted beans.
- Since the Kaldi doesn’t have a means of cooling the beans, direct a fan or blower at the beans and transfer them from bowl to bowl to cool them down and remove the chaff.
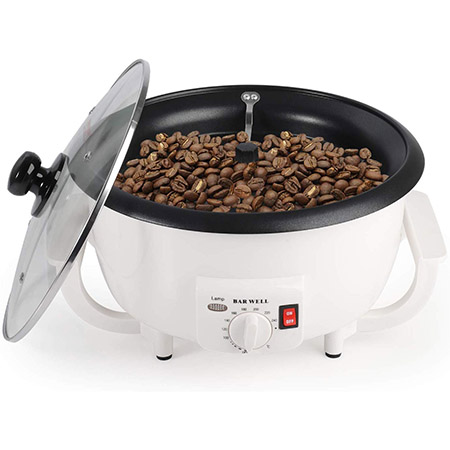
MIFXIN Coffee Roasting Machine – Best Countertop Roaster
The MIFXIN Coffee Roasting Machine is an example of utilitarianism and simplicity and is great for home use. With a capacity of 26 ounces or 730 grams, it allows for easy bulk roasting directly on your kitchen counter.
Using the design of a popcorn popper or popcorn maker with an automatic temperature setting, the MIFXIN allows you to roast your beans to the desired level with the turn of a dial. An interior rotating arm ensures that the beans roast evenly and don’t burn. The MIFXIN is also extremely versatile and can be used to roast goods other than coffee such as nuts and popcorn.
The only downside to the MIFXIN is its lack of a timer and smoke suppressor. Because of this, you will want to keep an eye on the roasting process to ensure that your beans don’t overcook. You’ll also want to keep it in a ventilated area during use.
While this roaster has a top-end roasting capacity of 730 grams, the ideal batch volume is about 170 grams. Higher weights will take way too long to cook, and anything less won’t turn correctly in the stirrer and result in uneven and inconsistent roasts. We also found that during operation the stirrer doesn’t quite reach the beans at the edge of the pan, so just give the whole thing a shake to ensure that all the beans get equal attention. Just make sure that the lid remains on top so that you don’t lose any heat.
While this is quite a generic roaster (there are several different brands on Amazon but it’s the exact same piece of equipment), it’s not bad for a beginner, and its ease of use is hard to beat. If you’re a more experienced roaster then you’ll probably want something with a smoke suppressor or timer. A neat feature that isn’t mentioned on any of the product listings is that the stirrer has an auto-reverse function. So if it gets stuck during operation, it will automatically reverse direction and hopefully free any beans that weren’t getting turned.
To show you how it works, Dave Mccalley on YouTube:
Pros and Cons
Pros
- Non-stick chassis.
- Easy to clean.
How to use the MIFXIN Coffee Roasting Machine:
- Preheat the roaster to 205C or 400F.
- Once the roaster has reached the desired temperature, open the lid, quickly add the beans and close it again so that any heat doesn’t escape.
- The lid is transparent, so you can actually watch the beans changing color and have a better idea of when to take them off. Like most of the suggestions above, between 8 – 10 minutes should give you a nice, smooth medium roast. Since this roaster doesn’t have a built-in timer, you’ll have to use an external timer to keep track of the time.
- Once the beans are ready, remove the lid (be careful of all of the chaff and smoke), then tip the beans into a bowl or tray to cool.
- Transfer the beans between bowls or colander to cool them faster, stop the roasting process, and remove any excess chaff.
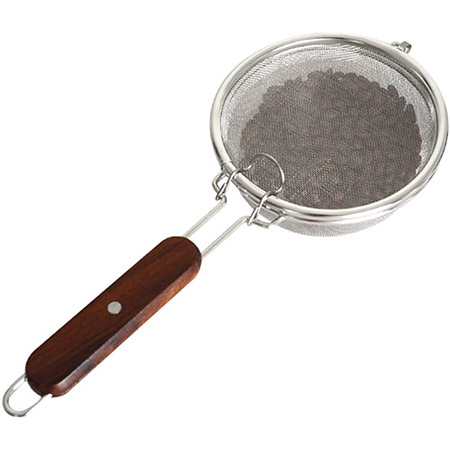
CAFEMASY Stainless Steel Home Coffee Roaster – Best Travelling Roaster
When it comes to simplicity, the CAFEMASY Stainless Steel Home Coffee Roaster takes first place. This is the ultimate design in simple, hands-on, and no-frills coffee roasting.
Using it couldn’t be easier. Simply place 50-80 grams of coffee beans into the mesh basket, close the top, and place it over a heat source or open flame for around 10 minutes. Unfortunately, electric stoves won’t work, so you’ll need an open fire or gas stove.
You’ll also need somewhat of an expert ear so you can determine when the first and second cracks take place. Once the beans have been roasted to your desired temperature, simply remove them from the heat source.
This roaster definitely won’t break the bank, but you’re not getting a complex, groundbreaking piece of equipment either. That being said it is dishwasher friendly, meaning cleaning up is a breeze, which can’t be said for many other home coffee roasters.
Pros and Cons
Pros
- Simple design.
- Extremely affordable.
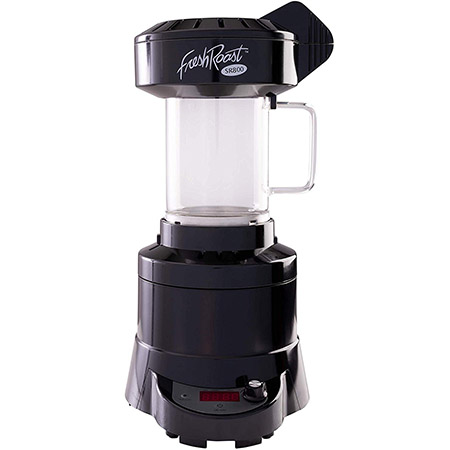
Fresh Roast SR800 – Most Consistent Roaster (Editor’s Pick)
The Fresh Roast SR800 is a great entry-level yet high-quality roaster that lets coffee drinkers and enthusiasts adjust key settings like temperature, fan speed, and roast time. With a single adjustment knob and an LED display to alert users, the SR800 is one of the easiest, reliable roasters around – but you pay for it.
The price tag is enough to put a large hole in some people’s pockets – but it does deliver consistent results. With 9 temperature settings and fan speeds, the entire roasting process takes somewhere between 10 and 20 minutes. But with a limited capacity of only 8 ounces or 225 grams, this device is only suited for small-batch home coffee roasting.
That being said, the SR800 scores high on nearly every other count, making it an ideal roasting companion for beginners and experts alike.
As the big brother to the Fresh Roast SR540, the SR800 comes equipped with a larger roasting chamber to accommodate more beans per roast. While the SR540 could only handle a maximum weight of 120g, the SR800 can accommodate 170g of dry-processed beans and 226g of wet-processed beans. The SR800 also comes equipped with a new heavy-duty high capacity fan and heater, as well as an improved control board, but other than that it’s still the same high-performing SR540 roaster.
A company called Fresh Roasted Coffee LLC in Pennsylvania shared a video on how the Fresh Roast SR800 works:
Pros and Cons
Pros
- Features are easy to adjust with a single knob.
- Easy-to-read LCD display.
How to use the Fresh Roast SR800:
- Start by measuring out your beans. We recommend using a little less than full capacity just to ensure a more even roaster. Between 170g and 200g beans should be ideal.
- Like the S540, the settings of the SR800 – the temperature control, fan speed, and time – are all controlled by a single knob. Preheat the roasting chamber by setting the temperature to 3, fan to 9, and timer to about 20.
- Once the chamber is the correct temperature, add the beans and lock the lid in place.
- Next, crank up the temperature to around 8 and the fan to 9. You can get a temperature reading by turning the knob to the right quickly. Once the temperature reaches around 200C or 400F, you should begin to hear the first crack.
- After about eight minutes, turn the temperature setting down to 6 or 7, but keep the fan setting high.
- At around 11 minutes, your beans will have reached a nice medium profile. Turn the temperature all the way down but keep the fan on to cool the beans. After this, they’re ready to grind.
After using the SR800 for some time, we discovered a few helpful tips that you can use to optimize the roasting process when roasting your own coffee beans. When roasting on cooler days, decrease the fan speed and increase the temperature of the device. This should help to compensate for the lower ambient, outside temperatures. If it’s really hot, increase the fan speed and decrease the temperature of the roaster to prevent your beans from roasting too quickly. In terms of roasting profiles, we found that the SR800 is better suited for medium roasts. Darker roasts, which are ideal for espresso, are okay, but they do tend to taste a little flat compared to other roasters for whatever reason.

How to Choose the Right Home Coffee Roaster
When shopping for something as niche as a home coffee roaster, it’s always good to do your homework. Having a goal in mind and knowing exactly what you want from your roaster is going to help you greatly when it comes to choosing one. With that in mind, we’ve put together this guide to help you navigate through all the various considerations you might have when purchasing a roaster.
Capacity
Different roasters have different capacities, and, depending on your needs, this is going to have a big impact. If you only intend to roast small amounts of beans per week, then you’ll probably want an air roaster that has a much smaller hopper. If you’re making larger quantities, however, then a drum roaster will be much better suited to the task.
Manual, or Automatic?
Do you want a machine that allows you to simply push a button and come back in a couple of hours when roasting is finished? Or do you prefer a more hands-on approach that allows you full control of all of the variables for a very personable roast?
In general, the more expensive the roaster, the more control you gain over roasting variables. That being said, even some of the cheaper, more basic options will require some oversight so that you don’t overcook your beans.
Higher-end roasters with more controllability will also allow you to save your roast profiles for later roasts. This gives you more precision and consistency when making multiple batches of beans since the roaster will automatically finish the beans according to the profile’s specifications.
Smoke Suppression
Roasting can be a smoky business. Depending on where you plan to position your roaster, the amount of smoke produced may or may not be an issue. If it is, then you may want to consider buying a roaster with built-in smoke suppression. All this does is ensure that most of the smoke is captured during the roasting process, but it’s a very useful feature.
Cooling Features
Heating and roasting the beans is only half of the entire process. Being able to cool the finished beans down is also crucial for achieving an ideal roast. If the beans aren’t cooled down fast enough, they’ll continue to roast because of the latent heat that has built up in the chamber.
Because of this you will want to consider how to effectively cool your beans. Most roasters come equipped with a fan to blow cool air through the roasting chamber once it’s finished roasting. Some, however, have built-in trays which allow the beans to be ejected from the chamber and rapidly cooled externally.
Consider what types of roasts you’re likely to be making, and whether or not you would benefit from additional cooling.
How to Roast Coffee at Home
Unsure of how long to roast your beans for or how they’re meant to look? Follow our color-coded roasting guide and never burn your beans again.
1. Green: The initial color of the beans when you buy them. They’ll stay this way during the beginning of the roasting process but quickly begin to change.
2. Yellow: Soon after roasting the green will give way to a more yellow or ochre color.
3. Steam: Don’t be alarmed if you start to see steam (it may look like smoke) emanating from the beans. This is due to the evaporation of the moisture inside the beans. If your roaster has a smoke suppressor it will help lessen the amount of steam escaping into your kitchen.
4. First Crack: After the steam starts to issue from the beans you should start to hear a cracking sound. This happens as the beans expand and the sugars within caramelize and usually occurs at temperatures around 196 °C (385 °F). At this point, the color of your beans will expand and darken, and the aroma should start to change from baked bread to caramelized sweetness.
The first crack should let you know that you’re nearing the end of your roasting process. Many lights to medium roasts end the process somewhere between the end of the first crack and the start of the second.
5. Second Crack: At approximately 224 °C (435 °F) the coffee will emit a second crack. At this point, the beans will have darkened considerably and will take on an oily surface sheen. This is the territory of dark roasts, and where much of the intense flavors associated with them come from.
After you’ve heard the second crack you really shouldn’t roast your beans for much longer, or else you risk combustion.
6. Black: If you continue roasting after the second crack you’ll notice thicker, more pungent steam start to escape. The surface of the beans will also take on an oily sheen as internal sugars start to burn. At this point continuing roasting becomes a dangerous affair, and your beans will start to vaporize.
2 comments
Great article. I like the way you explained the process. Simple and to the point. I enjoy roasting my coffee. I can get the exact taste I want and love.
Thanks Kevin! Glad you enjoyed the guide 🙂